Javascripts Advanced

JavaScript Advanced

Introduction

DOM

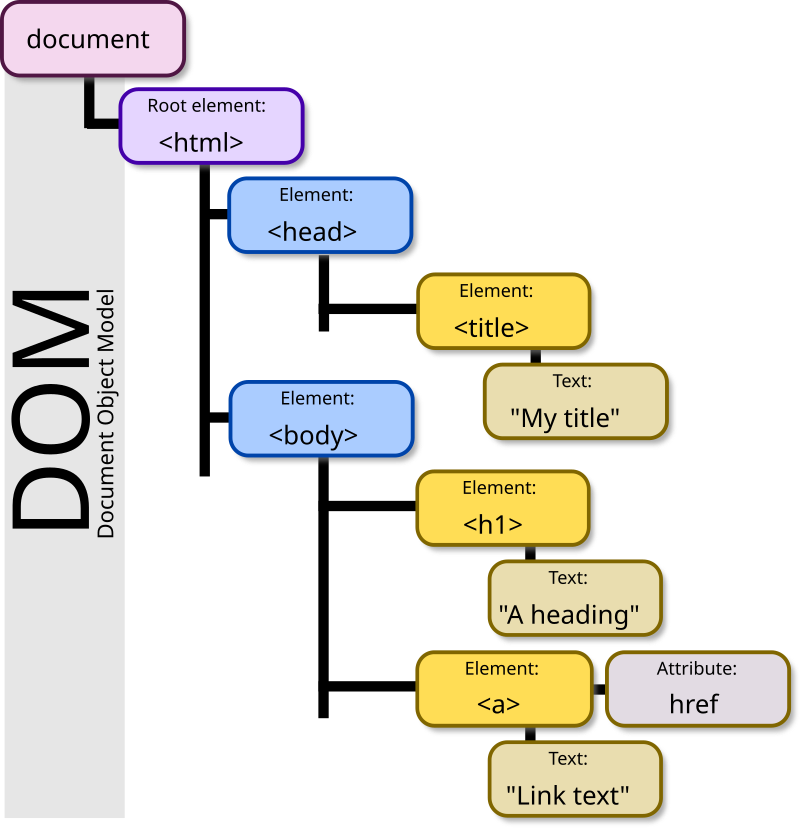
The DOM (Document Object Model) is a programming interface for web documents. It represents the structure of a web page as a tree of objects that can be manipulated with JavaScript.

Web browser construct a DOM when it loads an HTML file, and that is why we will use getElementById() in js!

Through the DOM, JavaScript can:

  • Change all HTML elements and attributes
  • Change all CSS styles
  • React to all existing events
  • Create new events

DOM

1
2
3
4
5
6
7
8
9
10
11
12
13
14
15
16
17
18
19
20
21
22
23
24
// Selecting elements
const element = document.getElementById('myId');
const elements = document.querySelectorAll('.myClass');

// Modifying content
element.textContent = 'New text';
element.innerHTML = '<strong>Bold text</strong>';

// Changing styles
element.style.color = 'blue';
element.style.backgroundColor = '#f0f0f0';

// Adding/removing classes
element.classList.add('new-class');
element.classList.remove('old-class');

// Creating new elements
const newElement = document.createElement('div');
document.body.appendChild(newElement);

// Event handling
element.addEventListener('click', function() {
alert('Element clicked!');
});
1
2
3
4
5
6
7
8
9
// DOM = document object model
console.dir(document)

// change some settings for the web page
document.title = "another title"
document.body.style.backgroundColor = "blue"
const greetings = document.getElementById("greetings");
const user_name = "test";
greetings.textContent += (user_name == "" ? `guest` : user_name);

Element Selectors

  • getElementById: returns an element by id or returns null (when nothing is found).
  • getElementByClassName: returns a HTML collection, which is similar to an array.
1
HTMLCollection(3) [div.fruit, div.fruit, div.fruit]
  • getElementByTag: returns a HTML collection chosen by tags(e.g. <h1>, <h4>)
  • querySelector: select an element with specific query. The most powerful and flexible.
1
2
3
4
5
6
7
8
// Select the first <p> element
const firstParagraph = document.querySelector('p');

// Select the first element with class "example"
const exampleElement = document.querySelector('.example');

// Select the element with id "header"
const header = document.querySelector('#header');
  • querySelectAll: returns a NODELIST, which is static. (select all the elements)
    • Nodelist has built-in forEach methods!

DOM navigation

For the DOM structure, it can be abstracted into a tree structure. Thanks to DOM navigation, we can easily navigate through different ids and selectors.

1
2
3
4
5
6
7
8
9
10
11
12
13
// DOM navigation
const element_2 = document.getElementById("fruits");
const first_child = element_2.firstElementChild;
const sibiling = element_2.nextElementSibling;
const last_child = element_2.lastElementChild;

console.log(first_child.textContent);
console.log(last_child.textContent);
console.log(sibiling.textContent);
console.log(element_2.nextElementSibling.firstElementChild.textContent);
console.log(element_2.nextElementSibling.previousElementSibling.textContent);
console.log(element_2.children);
console.log(element_2.parentElement);

Through flexible query selector and DOM navigation, we can freely choose the element we want in complex HTML components, rather than simply using the getElementByID() methods.

Add & Change & Hide & Show HTML

We can modify some properties of html elements in js files, but beyond that!

Add & Change & Remove

Just remember the DOM tree-structure!

1
2
3
4
5
6
7
8
9
10
11
12
13
14
15
16
17
18
19
20
21
22
23
24
25
26
27
28
29
30
31
32
33
34
35
// Add HTML elements
const h1_new = document.createElement("h1");
const new_id = "just a test"
h1_new.textContent = "I like pizza";
h1_new.id = new_id;
// you can add more styles and properties here!

// insert into the DOM structure
// ! using append and prepend
document.body.append(h1_new);
document.body.prepend(h1_new);
document.getElementById("dessert").append(h1_new);

// or using the insertbefore method
document.body.insertBefore(h1_new, document.getElementById("dessert"));


// remove HTML elements
// append as its child
const all_childs = document.getElementById("dessert").children;
console.log(all_childs);
document.getElementById("dessert").removeChild(document.getElementById(new_id));
console.log(all_childs);

// * a small demo: adding ordered list
const new_fruit = document.createElement("li");
new_fruit.textContent = "coconut";
new_fruit.id = "coconut";
// assume we need to insert this after the apple in the list
document.getElementById("orderlist-demo").insertBefore(new_fruit, document.getElementById("apple"));
// or we can use the method below for more flexible control
const ListItems = document.querySelectorAll("#orderlist-demo li")
// console.log(ListItems);
document.getElementById("orderlist-demo").insertBefore(new_fruit, ListItems[2]);

Hide & Show

You can use the onclick method or using event listener.

1
2
3
4
5
6
7
8
9
10
function hide_context(){
const hidden_text = document.getElementById("hidden-text");
console.log(hidden_text.style.display);
if(hidden_text.style.display === `none`){
hidden_text.style.display = "block";
}else{
hidden_text.style.display = "none";
}
console.log(hidden_text.style.display);
}
  • display will not leave space for the component to be vanished.
  • If you want the web structure to remain unchanged, you can modify the visibility property.
1
2
3
4
5
6
7
8
9
function hide_context_2(){
const hidden_text = document.getElementById("hidden-text");
console.log(hidden_text.style.visibility);
if(hidden_text.style.visibility === `hidden`){
hidden_text.style.visibility = "visible";
}else{
hidden_text.style.visibility = "hidden";
}
}

Event Listener

events:

  • click, mouseover, mouseon…
  • keydown, keyup…

A simple demo for movement control of a small button:

1
2
3
4
5
6
7
8
9
10
11
12
13
14
15
16
17
18
19
20
21
22
23
24
25
26
27
28
let x = 0;
let y = 0;
let move = 10;

document.addEventListener("keydown", event => {
if (event.key.startsWith("Arrow")) {
console.log(event);
// start moving
switch (event.key) {
case "ArrowUp":
y -= move;
break;
case "ArrowDown":
y += move;
break;
case "ArrowLeft":
x -= move;
break;
case "ArrowRight":
x += move;
break;
}

myBox.style.top = `${y}px`;
myBox.style.left = `${x}px`;
}
})

Classlist

The classList property is a powerful DOM feature that provides methods to work with an element’s CSS classes in JavaScript. It’s a cleaner alternative to manually manipulating the className property.

1
2
3
4
5
6
7
8
9
10
11
12
13
14
15
16
17
18
19
// adding classlist & remove
const my_button = document.getElementById("mbtn-1");
console.log(my_button.classList);

// adding properties via adding new "class"
// my_button.classList.add("enabled");

// adding properties when hovering
my_button.addEventListener("mouseover", event => {
event.target.classList.add("enabled");
})
my_button.addEventListener("mouseleave", event =>{
event.target.classList.remove("enabled");
})
console.log(my_button.classList);

// ! toggle: remove if present, add if not.
// replace(oldClass, newClass)
// contain(): return true or false

CallBack Hell

For JavaScript is single-threaded and relies on the event loop mechanism to handle asynchronous operations, it will cause error when calling functions with time stuck without using callback.

For example, I want to operate 4 tasks in sequential time order, I can use callback as follows:

1
2
3
4
5
6
7
8
9
10
11
12
13
14
15
16
17
18
19
20
21
22
23
24
25
26
27
28
29
30
31
32
33
34
35
36
37
38
39
40
41
42
43
44
45
46
47
48
49
50
51
52
53
54
55
56
57
58
59
60
61
62
63
64
65
66
67
68
69
70
71
// just for the demo of displaying callback hell :)

function task_1() {
setTimeout(() => {
console.log("Task 1 complete");
}, 3000);
}

function task_2() {
setTimeout(() => {
console.log("Task 2 complete");
}, 2000);
}

function task_3() {
setTimeout(() => {
console.log("Task 3 complete");
}, 1000);
}

function task_4() {
setTimeout(() => {
console.log("Task 4 complete");
}, 10);
}


// bad demo: will not follow the time order :(
task_1();
task_2();
task_3();
task_4();

// trying to use callback!
function task_1WithCallback(callback) {
setTimeout(() => {
console.log("Task 1 complete");
callback();
}, 3000);
}

function task_2WithCallback(callback) {
setTimeout(() => {
console.log("Task 2 complete");
callback();
}, 2000);
}

function task_3WithCallback(callback) {
setTimeout(() => {
console.log("Task 3 complete");
callback();
}, 1000);
}

function task_4WithCallback(callback) {
setTimeout(() => {
console.log("Task 4 complete");
callback();
}, 10);
}

task_1WithCallback(() => {
task_2WithCallback(() => {
task_3WithCallback(() => {
task_4WithCallback(() => {
console.log("all complete");
});
});
});
});

This is really a messy code! For all the event is nested and fails to be reconstructed.

1
2
3
4
5
6
7
8
9
task_1WithCallback(() => {
task_2WithCallback(() => {
task_3WithCallback(() => {
task_4WithCallback(() => {
console.log("all complete");
});
});
});
});

Promise

Promise is an object that manages asynchronous operations.

We can wrap a promise object around asynchronous code, which means “I promise to return a value”.

(resolve reject) => {asynchronous code}

1
2
3
4
5
6
7
8
9
10
11
12
13
14
15
16
17
18
19
20
21
// fix: with promises
function walkdog() {
return new Promise((resolve, reject) => {
setTimeout(() => {
resolve("I am walking dog");
}, 3000);
});
};

function cleanKitchen() {
return new Promise((resolve, reject) => {
setTimeout(() => {
reject("I am cleaning the kitchen");
}, 2000);
})
}

walkdog().then(value => {console.log(value); return cleanKitchen() })
.then(value => {console.log(value);})
.catch(error => {console.log(error)});

By using the chain tool instead of depending on callback hell, we can simplify our code!

async and await

Async: make a function return a promise.

Await: make a function wait for a promise.

It can allow us to write asynchronous code by using the synchronous manner.

1
2
3
4
5
6
7
8
9
10
11
12
13
14
15
16
17
18
19
20
21
22
23
24
25
26
27
28
29
30
31
32
// fix: with promises
function walkdog() {
return new Promise((resolve, reject) => {
setTimeout(() => {
resolve("I am walking dog");
}, 3000);
});
};

function cleanKitchen() {
return new Promise((resolve, reject) => {
setTimeout(() => {
reject("I am cleaning the kitchen");
}, 2000);
})
}

async function todo_list() {
try {
const waitresult = await walkdog();
console.log(waitresult);

const cleanKitchen = await cleanKitchen();
console.log(cleanKitchen);

console.log("Finished");
} catch (error) {
console.log("F!")
}
}

todo_list();

Communicate with backend

JSON in js

json.stringify(): convert a JS object to a JSON string.

1
2
3
4
5
6
7
8
9
10
11
12
13
14
15
16
17
18
19
const fruits = ["apple", "banana", "orange", "coconut"];
const json_strings = JSON.stringify(fruits);
console.log(fruits);
// a json string
console.log(json_strings);

// an object
const person =
{
"name": "amy",
"grades": 100,
"school": "sjtu",
"hobbies": ["1", "2", "3", "4"]
}
const json_person = JSON.stringify(person);
console.log(person);

// it is a string!
console.log(json_person);

It is a string!!!

We can use json.parse() to parse a string back to a js object (or an array).

fetch method in json

We can use fetch method to fetch json files in js.

1
2
3
4
5
6
7
8
9
10
11
12
13
fetch("demo1.json")
.then(response => {
if (!response.ok) throw new Error("Network error");
return response.json();
})
.then(values => {
if (Array.isArray(values)) {
values.forEach(value => console.log(value));
} else {
console.log("Received data is not an array:", values);
}
})
.catch(error => console.error("Fetch failed:", error));

​ Or we can pass APIs!

1
2
3
4
5
6
7
8
9
10
11
12
13
fetch('https://jsonplaceholder.typicode.com/posts/1')
.then(response => {
if (!response.ok) {
throw new Error('Network response was not ok');
}
return response.json(); // Parse JSON data
})
.then(data => {
console.log(data); // Process the data
})
.catch(error => {
console.error('Error:', error);
});
1
2
3
4
5
6
7
8
9
10
11
12
async function fetchData() {
try {
const response = await fetch('https://jsonplaceholder.typicode.com/posts/1');
if (!response.ok) throw new Error('Request failed!');
const data = await response.json();
console.log(data);
} catch (error) {
console.error('Error:', error);
}
}

fetchData();

image


Javascripts Advanced
https://xiyuanyang-code.github.io/posts/Javascripts-Advanced/
Author
Xiyuan Yang
Posted on
June 22, 2025
Updated on
June 22, 2025
Licensed under